|
Contents:
|
|
What Contiki is
"Contiki is an open source, highly portable, multi-tasking operating system for memory-efficient
networked embedded systems and wireless sensor networks. [...]
Contiki is designed for microcontrollers with small amounts of memory. A typical Contiki configuration
is 2 kilobytes of RAM and 40 kilobytes of ROM."
(Citation form the Contiki homepage)
Contiki is a package of Operating System components, network protocols and applications. MyCPU is using
the uIP TCP/IP stack (that originally came from the Contiki package) for years now.
Thanks to Adam Dunkels
(the author of Contiki) for his great work!
Contiki on MyCPU
Contiki provides a window operating system for MyCPU. Several programs can run in parallel, and every program
has its own window. Contiki does not replace the MyCPU Operating System, in fact it is a powerful
application program that provides some really nice widgets for MyCPU. You may remember the old times
where computers did run MS DOS as basic operating system. Later on Microsoft published its first Windows program.
In the beginning MS Windows was nothing else than an application running on DOS. This is exactly what Contiki
is on MyCPU: A window manager for some nice window based application programs.
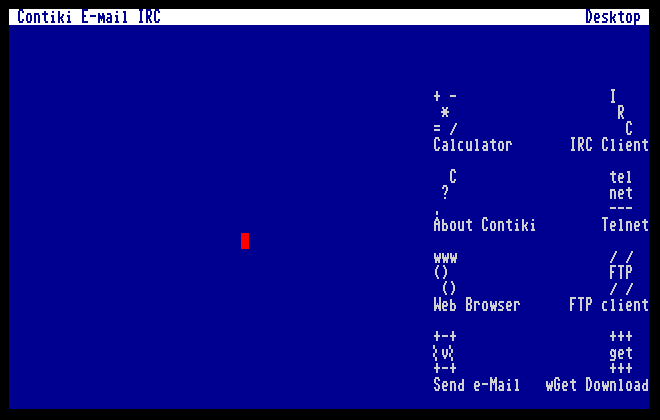
Contiki Applications
These applications are currently available for Contiki/MyCPU:
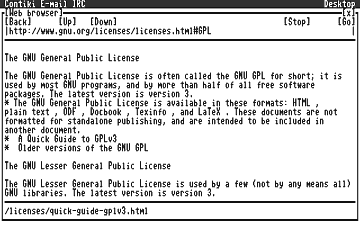
- text based internet web browser
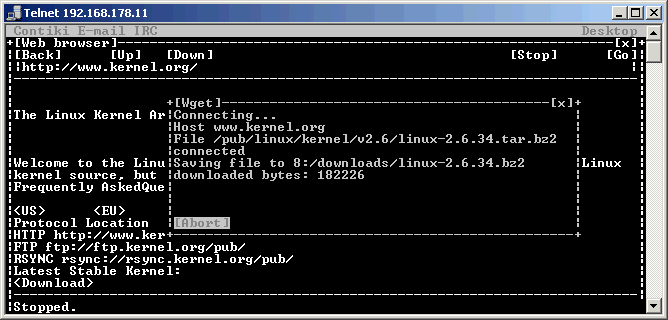
- wget application for http file download from the internet
- simple FTP client for file download from the internet
- simple Telnet client (proof of concept)
- simple e-Mail program (send mails only, proof of concept)
- Internet Relay Chart (IRC) client
- Calculator
Limitations:
The web browser does not show pictures, it can not execute java script and can not deal with
style sheets. The browser can only show plain html files correctly. You may try the new websites that are prepared
for mobile devices.
The wget application does not handle the resume command. It can handle only one download at a time.
The FTP client can only download files, uploading is not yet supported.
The Telnet client is still a "proof of concept". It works, but it is not very usable.
Same with the e-Mail program: The program can only send mails, but can not receive. For sending mails
you will need a so called "open relay" smtp server since password authentication is not supported.
The IRC client is simple but definitely usable.
The Clalculator can only deal with 16 bit unsigned numbers.
Hints:
IRC client: Join a channel by entering "/join #channel" at the chat prompt.
Sometimes F1 does not work when IRC client is in the foreground. Press F2 first and then F1.
e-Mail program: To be able to send e-mails you may want to setup a transparent e-mail gateway.
On Linux you can use the postfix mail server, for MS Windows hMailServer may be an alternative.
FTP client: To download a file, select the file by use of the cursor keys and press Enter. Sometimes you need
to press Enter two or three times (this is actually a bug).
Screenshots
|
(click on picture to enlarge)
|
|
Minimum Hardware Requirements
To be able to run Contiki, you need:
- the MyCPU ;-)
- memory base board (memory extension not required)
- interrupt controller board
- base board of the multi-I/O unit
- IDE control -or- ethernet interface (better: both)
If you do not have the ethernet interface board, you can configure your MyCPU System to connect to
the internet via RS232 and the SLIP protocol. But then you need to setup a special computer that
forwards SLIP packets to the internet.
For best performance you should have the VGA Unit and an old serial computer mouse!
How it works
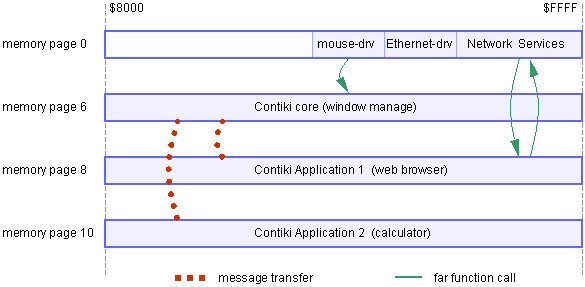
On MyCPU, Contiki is divided into several files (or so called "modules"). This is necessary because
MyCPU allows executables (or better: processes) not to be larger than 32kb.
Even though Contiki can be modularized and can load
application modules at runtime, I could not use this feature because Contiki requires a linear addressable
memory of at least 42 kbyte. All Contiki modules must share the same CPU process (this is because of the initial
design of Contiki), but on MyCPU the CPU can handle a multiple of 32kb processes. The problem with processes is
that the processes can not see each other. When programs that sit in different processes want to communicate,
they usually use a so-called "messaging system" to send short messages to each other
(this is called "inter-process communication" or "IPC").
But the Contiki application modules are not prepared to communicate through messages with the Contiki core.
So I had to modify big parts of the original Contiki code.
The Contiki core module contains the ctk window manager, the program handler application and the main messaging system.
It also controls the loading of application modules and the memory management itself. When the Contiki core is
started from the command line (by entering "contiki" at the prompt), it first starts basic services such
as mouse driver and the network subsystem. Then Contiki loads the configuration file "contiki.dsc" that
contains a list of application modules and the desktop icons for the modules. Thus the Contiki desktop is built
at load time.
When the user clicks on an icon Contiki starts loading the application module. The module is loaded into a separate
memory page that lays in parallel to the contiki core (the same address range, $8000-$FFFF). The application module
has no own execution thread, instead it is polled regularly by the Contiki core.
Because the Contiki window manager needs direct access to some data structures in the application module, many of
the data structures exist two times: The original structure resides in the application module, and a copy of it is in
the memory page of the Contiki core. Because the Contiki core knows about the position of the data structures
in the application modules, Contiki can update these structures at any time. And because Contiki has its own set
of copied data structures, the window manager is not slower on MyCPU than on other platforms (for example, it is not
necessary to copy data between the memory pages when the user moves a window on the screen or opens a dialog).
The figure depicts the memory layout when Contiki is loaded.
The bss segments ($4000-$7FFF) of the Contiki processes in the pages 6, 8 and 10 are not shown here.
File list:
| Contiki core
| 8:/bin/contiki |
| Contiki configuration file
| 8:/bin/ctk/contiki.dsc |
| web browser
| 8:/bin/ctk/webbrowser.ctk |
| wget file download
| 8:/bin/ctk/wget.ctk |
| FTP client
| 8:/bin/ctk/ftp.ctk |
| Telnet client
| 8:/bin/ctk/telnet.ctk |
| eMail program
| 8:/bin/ctk/email.ctk |
| IRC client
| 8:/bin/ctk/irc.ctk |
| Calculator
| 8:/bin/ctk/calc.ctk |
| Contiki help
| 8:/bin/ctk/help.ctk |
| Contiki "about"-dialog
| 8:/bin/ctk/about.ctk |
| mouse driver
| 8:/bin/mouse |
|
Mouse Control
It is more convenient to control Contiki by a mouse than only with the keyboard. I wrote a driver for
the old serial mice that are compatible to the Microsoft or Logitech standard. If you do not possess such an old
mouse or if you failed to obtain one from ebay, you can alternatively use an old analog joystick to control
the mouse pointer. Okey, it's also difficult today to get such an old joystick, but also the modern ones with
USB interface will do. You'll need a joystick with potentiometers. Simply remove the USB electronics from the
joystick and connect the potentiometers to the circuitry depicted below.
Joystick interface:
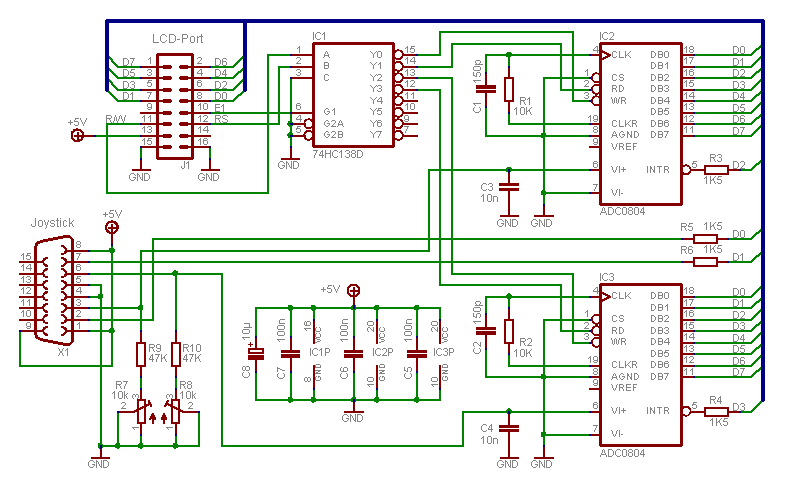
Note 1: The resistors R9 and R10 shall have half of the value of the potentiometers inside the joystick.
Note 2: The circuitry must be connected to the LCD port of the Multi-I/O Unit.
|
|
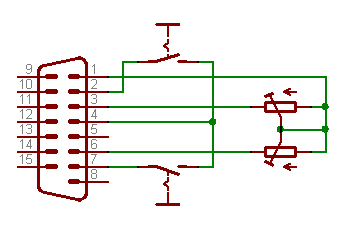
The figure on the right shows the schematics of an old analog joystick.
The potentiometers have usually a value around 100kOhm.
|
|
Mouse Driver
The mouse driver (8:/bin/mouse) supports mice and analog joysticks.
If you want to use a joystick to control Contiki, start the mouse driver without parameters. If you want to
use an old serial mouse, you must tell the driver the used serial port (this is most likely com1 because
com2 is used by remotefs by default and mouse support is senseless if you are working with a serial terminal
on com1). One more parameter
is used to distinguish between Microsoft compatible or Mouse System mice. Please have a look at this table:
| Use a joystick to control the mouse pointer
| mouse |
| Make joystick mouse slower
| mouse -r4 |
| Make joystick mouse faster
| mouse -r6 |
| Serial mouse on com1: (autodetect mouse type)
| mouse com1: |
| Microsoft compatible mouse on com1:
| mouse com1: -t1 |
| Logitech compatible mouse on com1:
| mouse com1: -t1 |
| Mouse System compatible mouse on com1:
| mouse com1: -t2 |
| Mouse with higher resolution on com2:
| mouse com2: -r3 |
| Mousee with lower resolution on com2:
| mouse com2: -r8 |
|
Enter "mouse -?" at the shell prompt to see a complete list of all supported options.
I have tested the driver with these mice: Microsoft Serial Mouse V2.0 (with PS2 adapter),
Microsoft Serial Mouse V2.0A, Logitech Mouse (2 button and 3 button), Genius Mouse in Microsoft mode (2 button) and
Mouse System mode (3 button).
Configuration
Contiki can be configured by setting several environment variables in the 8:/init -file. To change
the default configuration you can open the init-file with the text editor: Simply enter
" edit 8:/init " at the command prompt. Scroll down to the appropriate
"SET" statement and change the value of the variable. If you have an older
init-file you may need to insert the corresponding line.
The table shows the environment variables that are recognized by Contiki:
| Set-Commad / Variable / Value
| Meaning |
SET CTK=8:/bin/ctk
| Tells Contiki the place were the .ctk modules and the configuration files are stored. |
SET DOWNLOADS=9:/downloads
| This variable sets the location were downloads from the internet are stored. |
SET MOUSE=8:/bin/mouse com1:
| Tells Contiki the command that is used to start the mouse driver. |
|
Hint:
DOWNLOADS is set to 8:/downloads by default. You may want to put the downloads directory to an other
disk partition, because the other partitions are still unused and bigger. For example, edit your init-file and
set DOWNLOADS=9:/downloads
How To Run Contiki
Contiki is not an self-contained OS, but an application on MyCPU. Applications are started by entering their names
at the command prompt. Same with Contiki: After MyCPU has booted up, enter " contiki "
at the prompt to start the program.
Contiki will automatically start the networking subsystem and the mouse driver,
if configured in the 8:/init file.
Links
o The Contiki homepage
|