vCPU - A virtual 16-bit CPU
Table of Contents:
Introduction
vCPU is a virtual 16-bit CPU that is emulated by MyCPU in software. Why that? There are two reasons: First of all,
it was a pleasure to program it :-) and second, much more important, it became more and more necessary to break with
the old MyCPU memory model. As you may already know MyCPU has only an address space of 64kB (because of the 16 address lines),
and even more worse, the biggest continuous memory area is only 32kB in size. This disallows executable programs to
become larger than 32kB. But there is a trick to circumvent this limitation: Programs can do heavy memory-paging, like
contiki does. Every module occupies its own 32kb memory page, so the whole program can be very complex,
but every component can not be larger than 32kB. This is for example a problem for the contiki web browser, that already uses
the whole 32kB memory page, and thus can not be enhanced any more.
vCPU will break with this limitation now since it has a plane memory model that utilises the whole 1 MB RAM memory of MyCPU.
This is a big advantage for modern Cross-Compilers that have difficulties with generating code for memory-paged target platforms.
Because of this vCPU is ment to be a better backend for higher language Cross-Compilers.
By the way: I was inspired by SWEET16
which is a 16-bit emulation for 6502 CPUs that was originally
developed by Steve Wozniak.
If you want to dive deeper into the matter of SWEET16 you should read
this page.
Two flavors of vCPU
There are two different implementations of vCPU for MyCPU: The first implementation is a pure interpreter that
"emulates" the 16-bit CPU in software. This is rather an academic approach because it is a "clean"
implementation of a CPU in software. But because it is interpreter-based, it is also very slow. So I thought of increasing
the execution speed and came to the result that I have to translate each vCPU instruction into (a couple of) native
MyCPU instructions, comparable to JIT-compilers that are for example used to speed up the execution of JAVA byte code.
But because MyCPU is too slow to translate the vCPU code at runtime into its native code I went an other way. vCPU2 is a
real theoretical construct: I have written a cross-compiler
(
myca)
that translates vCPU assembly files directly into MyCPU OP-codes.
With this approach I can speed up the execution time by at least a factor of four!
Memory Layout
A vCPU program can utilize the whole available RAM of MyCPU. Since MyCPU can address up to 1 MB, this results in a usable
address range of 0x0000000 - 0x000FFFFF. The following table shows the memory layout seen by a vCPU program:
0x000FFFFF
0x000FB000
|
0x000FAFFF
0x000FA800
|
0x000FA7FF
|
|
|
The data segment follows
the program code
|
The program starts at
0x00000000
|
|
20 kB reserved for
vCPU interpreter
|
2 kB Stack Memory
for interrupt handlers
|
Program Stack Memory
(growing downwards,
default size 10 kB)
|
Unmapped Memory
(n pages of 16 kB)
|
Heap Memory
(growing upwards)
|
Program Data
|
Program Code
|
|
A vCPU application program starts always at address 0x00000000. The data section and heap memory follows
the code section. Note that vCPU2 disallows mixing of code and data, thus it is always a good practise to
separate the sections. As you can see the upper 20 kB of memory are reserved for the runtime environment.
The vCPU interpreter resides there, and if you compile your program as vCPU2, this memory region is used
to store the extended runtime library of vCPU2.
Instruction Set and Registers
vCPU supports up to 128 instructions, but not all are used yet. Most of the instructions are for 16-bit operation,
but there are also some 32-bit instructions that operate on two registers. This makes porting 32-bit code
to vCPU more convenient. vCPU has overall 16 registers that are 16-bit wide. The registers are named r0 - r15,
whereas the upper two (r14 and r15) are used as 24-bit stack-pointer and 8-bit flags register.
An instruction has a length of two or four bytes. The instruction code itself is always stored in the first byte,
and the second byte is used to store two register names. The four-byte-instructions are using the additional
two bytes to store immediate values. Also there are some very special instructions that allow a vCPU program to
communicate with the MyCPU Operating System.
Please see the
vCPU handbook
for the complete list of supported instructions.
Two Stacks
To increase the execution speed on MyCPU the vCPU uses two separate stacks: One call stack and one data stack.
The call stack is borrowed from MyCPU, it is the 256 byte stack at hardware address 0x0100-0x01FF. Since a
call-return-address has a size of 24 bit, the maximum call-depth of vCPU is limited to 256/3 = 85 calls.
The data stack is a virtual stack that can use the whole 1 MB RAM memory of MyCPU. Only the data stack
can be accessed by vCPU OP-codes directly. Since the call stack is outside of vCPUs view, it is more
complicated for a vCPU program to manipulate the stack. Unfortunately this makes it difficult to implement
multitasking operating systems on vCPU.
vCPU Modes
vCPU knows two modes of operation: The standard mode and the exclusive-access-mode. A vCPU program starts
always in standard mode. The standard mode allows parallel execution of one vCPU program and the MyCPU
Operating System including all its services like networking (Telnet, Webserver) and Remote Filesystem.
When the vCPU application program switches the vCPU into exclusive-access-mode, all background services
are stopped and the vCPU program has exclusive access to all the underlaying hardware, including all RAM,
interrupt services and hardware extension cards. This mode of operation is thought to be used for
implementing a 16-bit Oparating System for MyCPU. Note that this mode is not fully implemented yet.
Although a vCPU program can use MyCPU hardware interrupts, it is still not possible to do
context-switching from within an interrupt handler to implement pre-emptive multi-tasking.
Program Loader
vCPU application programs are started on MyCPU like any native MyCPU program: You need only enter the
program name at the shell prompt, and MyCPU knows how to deal with it.
The trick lies in the new program header that I have introduced with kShell version 2.3. The program
header can now contain an optional string that tells MyCPU which other program must be loaded first
to be able to execute the requested progam. This other program is called "the loader program".
In case of vCPU the loader program is the vCPU interpreter that interprets the vCPU byte code.
In case of vCPU2 the loader program contains the extended runtime environment for the vCPU2 program code
(that is indeed native MyCPU assembly code).
The loader-string in the program header is either
"LDR:VCPU" for vCPU or
"LDR:VCPU2"
for vCPU2. When MyCPU sees such a string, it looks into the directory
8:/bin/ldr and
executes from there the appropriate loader program. The vCPU application program is then given as
the first argument to the loader. For example, if you execute a vCPU program called
"
vcputest", MyCPU would execute this command:
"
8:/bin/ldr/vcpu vcputest <further arguments>"
Example Program
This is a small program that demonstrates the function of vCPU and vCPU2.
You can download the used crossassembler
myca
in the
download section of my website.
.target vcpu
.mode ascii

dataseg segment code

text_hello  DB "Hello World!\n", 0

codeseg segment code
org 0

main:   ldp   p0,#text_hello
        sout  p0

        ld    r2,#'A'
@L1:    cout  r2
        inc   r2,#1
        cmpu  r2,#'Z'+1
        jpnc  @L1
        ret
|
The program outputs the text "Hello World!" and the characters A-Z. The characters are printed
in a loop that starts just behind the
sout command that outputs the hello-world string.
Now lets look at the output generated by
myca for vCPU and vCPU2:
Assembled with "myca testprog.c -l -t vcpu":
|
Assembled with "myca testprog.c -l -t vcpu2":
|
            .target vcpu
            .mode ascii

            dataseg segment code

28 48656C6C text_hello  DB "Hello World!\n", 0
2C 6F20576F
30 726C6421
34 0A00


            codeseg segment code
            org 0
 0 11001000 .targetop vcpu_prog_hdr
 4 06004C44
 8 523A5643
 C 50550000


10 17082800 main:   ldp   p0,#text_hello


14 2708             sout  p0


16 77024100         ld    r2,#'A'


1A 2602     @L1:    cout  r2


1C 3C12             inc   r2,#1


1E 75025B00         cmpu  r2,#'Z'+1


22 1B001A00         jpnc  @L1


26 0100             ret
|
|
           .target vcpu
           .mode ascii

           dataseg segment code

755 48656C text_hello  DB "Hello World!\n", 0
758 6C6F20
75B 576F72
75E 6C6421
761 0A00

           codeseg segment code
           org 0
           ;vCPU2 Runtime Library Block:
  0 011018871014804C44523A5643505532000006806C3A803161FA21048002...
 30 DA003F391E3F391F3E39000101013E39003E39003E39003E39003E39003E...
 [...]
6F0 3831C74200401F51C235010042003831C54200405FC66E01401F51C23501...
720 801A2880

  ;vCPU2:  main: ldp   p0,#text_hello
724 6C5507         LPT  #(text_hello)&0xFFFF ;load abs value, lo
727 6F90           SPT  $90     ;store in register r8
729 6C0000         LPT  #((text_hello)>>16)&0x000F ;load abs value, hi
72C 6F92           SPT  $92     ;store in register r9
  ;vCPU2:        sout  p0
72E 5010           LDX  #0x10   ;load register name
730 1A5980         JSR  $8059   ;vcpu_sout

  ;vCPU2:        ld    r2,#'A'
733 6C4100         LPT  #('A')&0xFFFF ;load value
736 6F84           SPT  $84     ;store in register r2
           @L1:
  ;vCPU2:        cout  r2
738 3184           LDA  $84     ;load register r2
73A 1A5680         JSR  $8056   ;vcpu_cout
  ;vCPU2:        inc   r2,#1
73D 7C84           INC  $84     ;increment r2.l
73F 184487         JNZ  _N@0001
742 7C85           INC  $85     ;increment r2.h
744 1ABD81 _N@0001 JSR  $81BD   ;vcpu_set_zeroflag
  ;vCPU2:        cmpu  r2,#'Z'+1
747 6C5B00         LPT  #('Z'+1)&0xFFFF ;load value to compare with
74A 3004           LDA  #0x04   ;load register name
74C 1A9580         JSR  $8095   ;vcpu_cmpu_i
  ;vCPU2:        jpnc  @L1
74F 143887         JNV  ((@L1)&0x7FFF)|0x8000 ;jump if carry is not set

  ;vCPU2:        ret
752 103580         JMP  $8035   ;vcpu_ret
|
|
As you can see the code that is generated for vCPU is much smaller than the code generated
for vCPU2. But since vCPU2-code is translated into native MyCPU instructions, vCPU2 is much
faster than vCPU.
The Debugger
I have developed a simple debugger which you can use to debug your vCPU programs. Please note
that only vCPU programs can be debugged, not vCPU2 programs. This is because vCPU2 programs
are translated directly into MyCPU machine language. Of course you could use the debugger
that is built into the MyCPU emulator, but it is no fun to debug a vCPU2 program this way.
To debug a program simply enter "
vcpud programname" at the command prompt.
Below you will find a simple vCPU program. Copy & paste it into a text-editor, save the
file with the name "
test.asm" and enter this command:
# myca test.asm -l -o test
This will generate the vCPU program binary called "test" and a listfile named
"test.lst".
;===================================================================================
.target vcpu                ; tell myca to assemble for vCPU (use 'vcpu' or 'vcpu2')
.mode ascii                 ; switch to ASCII mode, since vCPU is ASCII compatible
vcpu_stack_size set 10*1024 ; set size of stack to 10 kbyte
vcpu_heap_size set 16*1024  ; set size of heap to 16 kbyte
codeseg segment code        ; generate a new code segment with the name codeseg
org 0                       ; bind the segment to address 0x000000
;===================================================================================

; Place all data into the dataseg segment.
; myca will place the data automatically behind the program code.
dataseg segment code

text_cmdline    db  "Commandline  : ",0
text_stackptr   db  "Stackpointer : 0x",0
text_heapstart  db  "Start of heap: 0x",0
text_heapend    db  "End of heap  : 0x",0
text_version    db  "vCPU version : Rev.",0
temp_print_buf  ds  11

; The program code is filled into the codeseg segment:
codeseg segment code

main: ;main program, starts at address 0x000010 on vCPU
          ldp   r0,#text_cmdline
          sout  r0
          sout  p0
          call  newline

          ldp   r0,#text_stackptr
          sout  r0
          movd  d0,sp
          and   d0.h,#0x00FF
          call  printhex32
          call  newline

          ldp   r0,#text_heapstart
          sout  r0
          movd  d0,p1
          call  printhex32
          call  newline

          ldp   r0,#text_heapend
          sout  r0
          movd  d0,p2
          call  printhex32
          call  newline

          ldp   r0,#text_version
          sout  r0
          mov   r0,r7
          xor   r1,r1
          call  printdec32
          call  newline
          ret

newline:
          push  r0,r0
          ld    r0,#'\n'
          cout  r0
          pop   r0,r0
          ret

printhex4:
          and   r0,#0Fh
          cmpu  r0,#10
          jple  _ph4
          add   r0,#'A'-'0'-10
_ph4      add   r0,#'0'
          cout  r0
          ret

printhex8:  ;input: r0 = 8-bit number to print
          push  r0,r1
          mov   r1,r0
          sftr  r0,4
          call  printhex4
          mov   r0,r1
          call  printhex4
          pop   r0,r1
          ret

printhex16: ;input: r0 = 16-bit number to print
          push  r0,r1
          mov   r1,r0
          movhl r0,r0
          call  printhex8
          mov   r0,r1
          call  printhex8
          pop   r0,r1
          ret

printhex32: ;input: r0,r1 = 32-bit number to print
          push  r0,r2
          mov   r2,r0
          mov   r0,r1
          call  printhex16
          mov   r0,r2
          call  printhex16
          pop   r0,r2
          ret

printdec32: ;input: r0,r1 = 32-bit number to print
          push  r0,p0.h
          ldp   p0,#temp_print_buf+10
          xor   r2,r2
          tstd  r0
          jpnz  _pdec2
          ld    r0,#'0'
          cout  r0
          jump  _pdec1
_pdec3    ld    r4,#10
          xor   r5,r5
          mov   r2,r0
          mov   r3,r1
          divd  r0,r4
          muld  r4,r0
          setc
          sbcd  r2,r4
          add   r2,#'0'
          decd  p0,1
_pdec2    stb   r2,(p0)
          tstd  r0
          jpnz  _pdec3
          sout  p0
_pdec1    pop   r0,p0.h
          ret
|
You can now copy the binary file into the rfs-folder of the
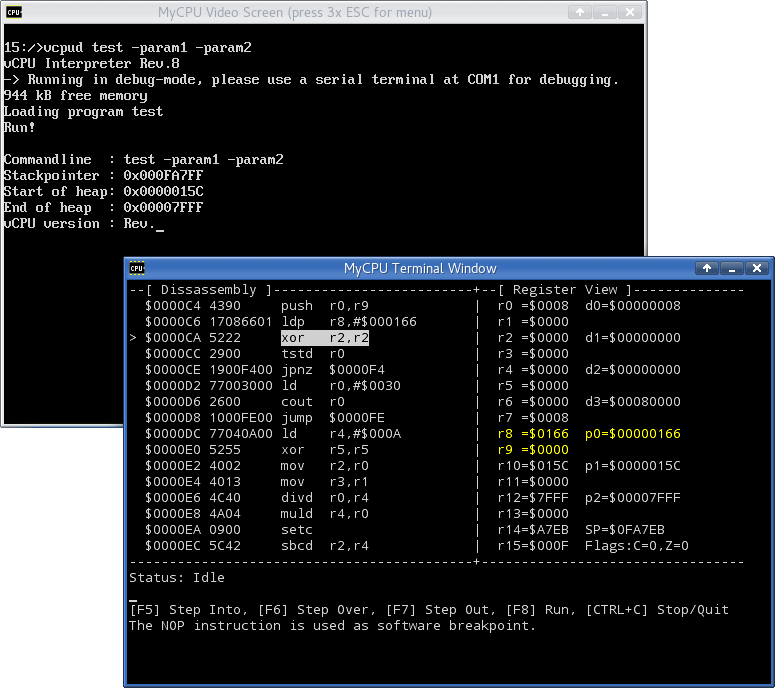
MyCPU emulator. To start the vCPU program, run the emulator and enter the following commands:
8:/> remotefs com2: 15:
8:/> vcpud 15:/test
This will start the debugger which will in turn load the test program. A second window gets opened,
this is the debugger control window. Indeed this is the ASCII Terminal window because the
debugger uses com1 for its output:
Just for fun you can now compile the program as a vCPU2 program. To do this, enter:
# myca test.asm -l test2.lst -o test2 -t vcpu2
The option "-t vcpu2" will overwrite the line ".target vcpu" in the
source file, thus a vcpu2 binary will be generated. You will notice that the generated
binary and the listfile are much bigger than the vcpu files. Like the vCPU-program the
vCPU2-program can simply be started by entering its name at the MyCPU command prompt.
But remember, it is not possible to debug this program with the vCPU debugger
("vcpud test2" will not work).
Get the vCPU Handbook
Get the latest version of the vCPU handbook:
<< go back